Detroit Diesel Diagnostic Link (DDDL) Software: Snapshot Menu
Snapshot - DDDL v6.50
 |
| Figure 1.1 - Instrumentation (Snapshot) |
To start a new Snapshot:
1). Connect DETROIT Engine (Series 60) using Detroit Diesel Diagnostic Link (DDDL v6.50). Read More: How to Connecting DETROIT Engine using Detroit Diesel Diagnostic Link (DDDL).
2). Choose New from the Snapshot menu or press Start Recording button to open the Snapshot control window.
 |
| Figure 1.2 - Snapshot (New) |
3). Data from the ECM is recorded for the Snapshot immediately after you have
chosen New (or press Start Recording button).
 |
| Figure 1.3 - Record Snapshot (Start Recording) |
4). To mark a particular time in the recording so that you can annotate it or come back and look at it in more
detail when you replay it:
→Press Mark User Event, press the Space bar on the keyboard, or choose User Event from the Snapshot menu.
→To display the Annotation Editor to add text annotations to the snapshot: Press Annotate.
→Press Mark User Event, press the Space bar on the keyboard, or choose User Event from the Snapshot menu.
→To display the Annotation Editor to add text annotations to the snapshot: Press Annotate.
 |
| Figure 1.4 - Add or Modify Annotations |
#Annotation Editor
To create a new annotation:
a). In the Annotation Time spin boxes, enter the time at which you want the annotation to become active. Enter the number of Hours, Minutes, and Seconds from the beginning of the snapshot.
b). Enter the required annotation text in the right-hand edit box.
c). Press Enter.
To edit an existing annotation:
a). Click on the annotation in the left-hand box to select it - the time and text will appear in the Annotation Time spin boxes and the text in the right-hand edit box.
b). Edit the text in the right-hand edit box.
c). Press Enter.
To close the Annotation Editor: Press Exit.
5). To stop recording: Press Stop Recording button, press the Escape key, or choose Close from the Snapshot menu.
Close (Snapshot)
The effect of Close on the Snapshot menu depends on whether you are viewing a saved snapshot or recording a new one. To close the "Instrumentation" window and/or "Fault Codes" window used for viewing a saved snapshot. You will be asked if you want to save the new snapshot:
 |
| Figure 1.5 - DDDL (Save changes) |
Press Yes if you want to save the snapshot by
displaying a Save As dialog box:
 |
| Figure 1.6 - Save As (Snapshot) |
This is a standard Windows Save As dialog box:
→Use the dialog box to select a folder for the file.
→Enter a File name for the file.
→Press Save to save the file.
Open (Snapshot)
To open a previously saved snapshot:
a). Choose Open from the Snapshot menu to display an
Open dialog box:
 |
| Figure 1.7 - Snapshot (Open...) |
b). This is a standard Windows Open dialog box:
→Use the dialog box to select the folder containing the required
file.
→Click on the required file in the list to select it.
→Press Open to open the file.
 |
| Figure 1.9 - Open Snapshot File (.ddl) |
c). When you press Open:
→If the "Instrumentation" window is already open, it will show the recorded instrumentation data (refer to Figure 1.1 above), and
snapshot replay controls will be added to the bottom of the window so that you
can replay the snapshot.→If the "Fault Codes" window is already open, it will show the recorded fault codes, and snapshot replay controls will be added to the bottom of the window so that you can replay the snapshot.
 |
| Figure 2.1 - Fault Codes windows |
→If neither window is open, the Instrumentation window will be opened
with snapshot replay controls added to the bottom of the window so that you can
replay the snapshot.
Snapshot to CSV
b). The Available box lists all the parameters not
currently selected for export; the Selected box lists all the parameters
currently selected for export.
c). To highlight a parameter in the Available or Selected list so
that you can move it to the other list:
Snapshot to CSV
After you have created a Snapshot, or opened a saved Snapshot, you can export the data it contains to a file in comma separated value
(.csv) format. You will then be able to open the .csv file in a program such as
Microsoft Excel to analyze the data further.
#To export the snapshot to a comma separated value (.csv) file:
a). Choose Snapshot to CSV from the Snapshot menu to display the
Export log file (.ddl) to .CSV file dialog box:
 |
| Figure 2.2 - Snapshot to CSV (Snapshot) |
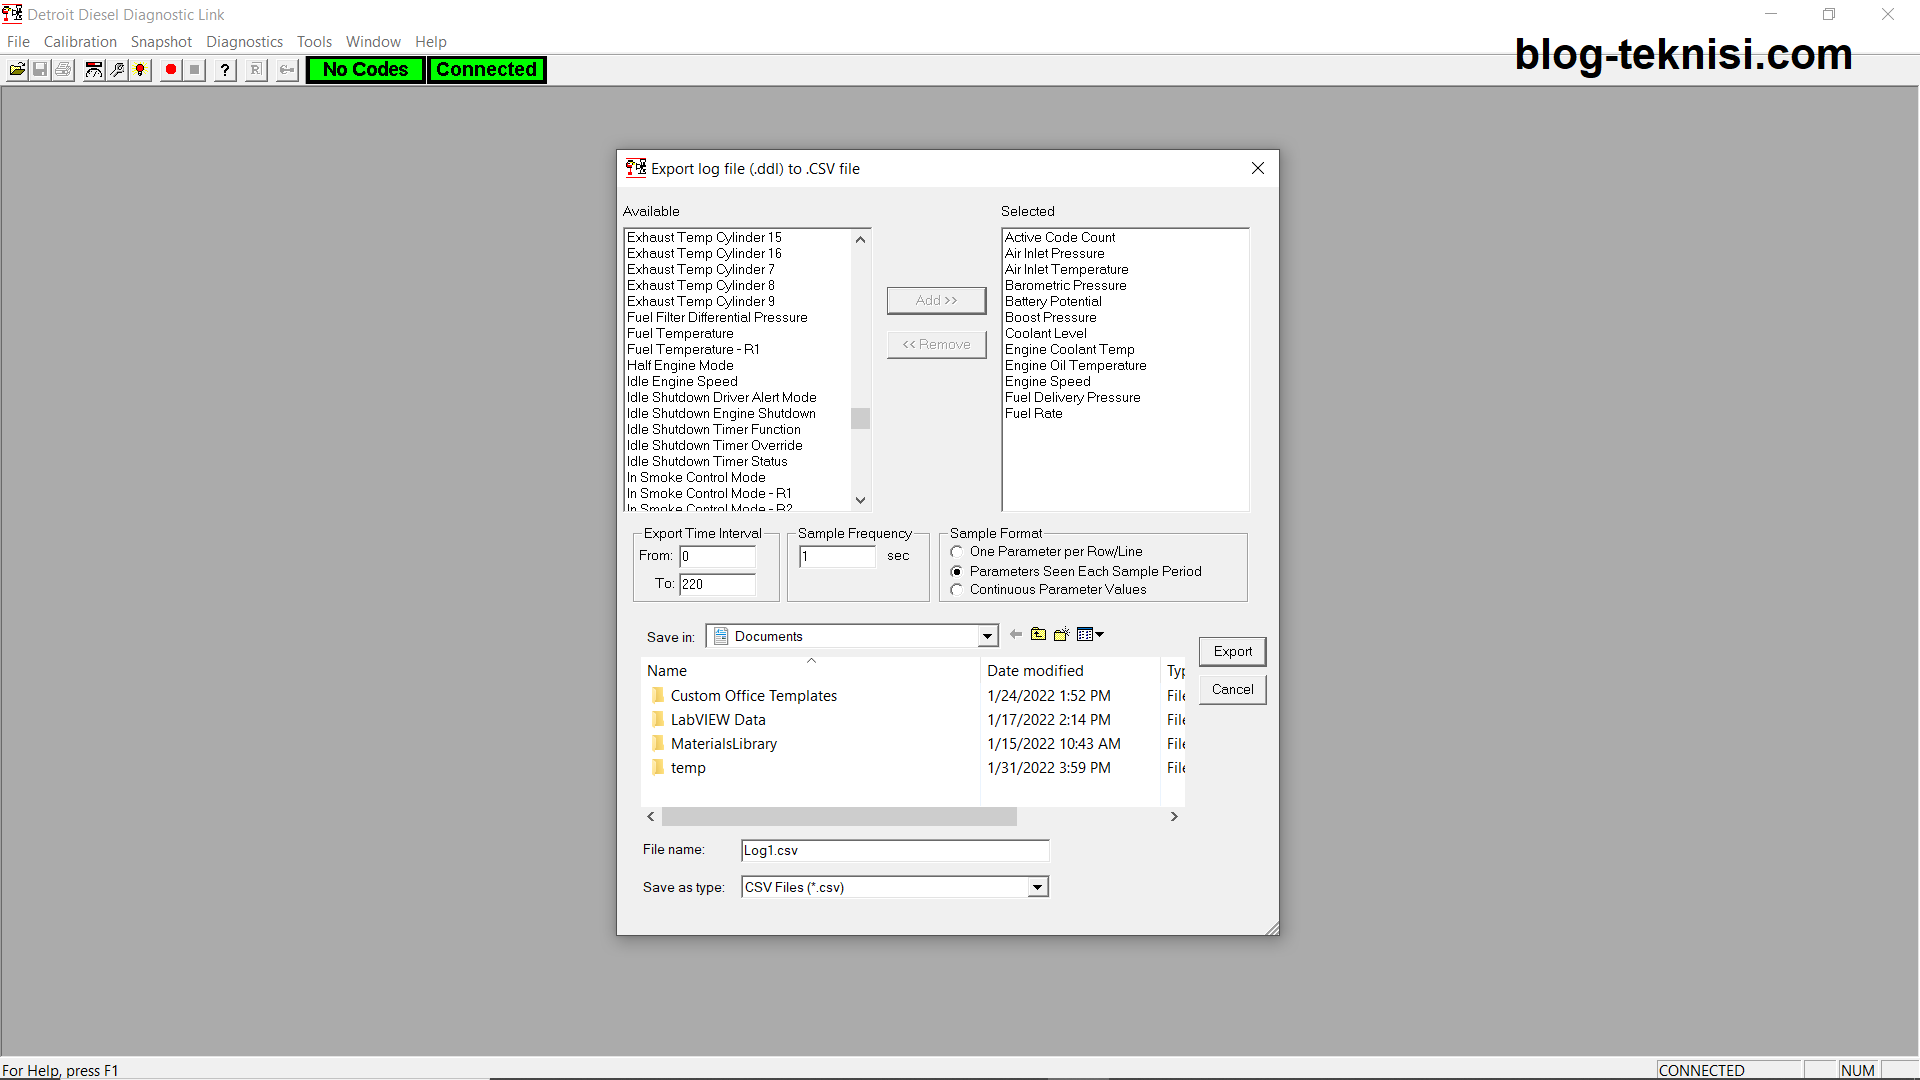 |
| Figure 2.3 - Export log file (.ddl) to .CSV file |
→Click on the parameter in the Available or
Selected list box to highlight it.
→To highlight a group of adjacent parameters:
▪Click on the first parameter in the group.
▪Shift-click on the last parameter in the group.
g). Open .csv file in a program such as Microsoft Excel.
d). To add another parameter to the selection of highlighted
parameters:
→Ctrl-click on the parameter.
e). To move the highlighted parameters from the Available to the
Selected list:
▪Press the Add button.
▪To remove the highlighted parameters from the
Selected list:
▪Press the Remove button.
f). Press Export to export the selected data to the named .csv
file.
 |
| Figure 2.4 - Export |
 |
| Figure 2.5 - Log1.csv |
Read More:
Blog.Teknisi
0 Response to "Detroit Diesel Diagnostic Link (DDDL) Software: Snapshot Menu"
Post a Comment